Thursday, 16 August 2018

How to install iOS 12 Beta 8 on iPhone or iPad

Two days after releasing and again pulling back the beta 7, Apple is back with its new iOS 12 Beta 8 for registered developers for download for iPhone, iPad and iPod touch.


The previous beta 7 had so many bugs that resulted in a sluggish device performance. Also, the group FaceTime call has been removed for now until the final release, there is a new welcome screen in Messages app and the Measure app icon has been modified.Image result for How to install iOS 12 Beta 8 on iPhone or iPad


Same is the case with Beta 8 besides fixing the performance issues that were faced in Beta 7.


If you want to install iOS 12 Public Beta 6 rather than testing the iOS 12 developer beta 8 then here is how to install iOS 12 beta on iPhone & iPad.


The iOS 12 developer beta 8 is currently available for download registered developer only. The registered developer can install this beta from the developer account or can directly update via OTA mechanism if they have already installed the previous beta from Settings >> General >> Software Update.


If you’re not a developer then you can join the Apple Developer Program, which includes a signup fee of $100.


But is it possible to get the developer beta 8 of iOS 12 even without developer account?


Of Course Yes! You can easily install iOS 12 beta 8 profile on your iPhone, iPad and iPod Touch without Developer Account or Computer but we don’t recommend and try it at your own risk and wait for it’s public beta or official.


Here’s a simple step to download and install iOS 12 beta 8 without a developer account or computer on iPhone or iPad.


How to Download iOS 12 beta 8 without developer account


Step 1: Launch Safari on your iPhone/iPad, and enter this URL.


Step 2: It will then redirect to iOS 12 beta profile management page. Tap to Slow download (Free) to install the developer profile on your device.


Step 3: After the profile is installed, you will be asked to restart your device. Tap on Restart.


How to install iOS 12 beta 8 without developer account


Note: Your device must have a 50% charge level or connected to a power source with lightning cable.


Step 4: Now Go to Settings >> General >> Software Update. Tap Download and Install iOS 12 beta on your iPhone/iPad as normal like you update via OTA.


Step 5: Enter your passcode. Agree on the terms & Condition.


Step 6: Seat back and relax for sometimes until it completes downloading. Next Tap on install to get iOS 12 BETA 8 on your iPhone or iPad.


That’s it. You have now successfully installed 8th beta of iOS 12 on your iPhone/iPad without a developer account.


iOS 12 Compatible devices


So this is all guys! Hope you find it useful and don’t forget to share it with your friends too.


Keep visiting www.imangoss.net and don’t forget to subscribe for daily updates.


Also, See


Jihosoft Giveaway Alert:
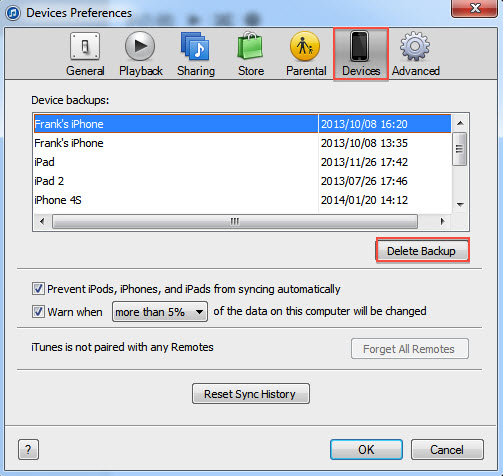
iPhone Backup Extractor - Extract Data from iPhone Backup

The best iPhone Backup Extractor software to extract photos, text messages, contacts, voice memos, note, WhatsApp, Viber and etc from iPhone/iPad backup.
Must Read:Jihosoft iTunes Backup Unlocker
Jihosoft Android Data Recovery: the best Android Data Recovery software for Windows and Mac to recover deleted contacts, messages, photos, videos, WhatsApp and etc from Android devices.If you can’t sync with iTunes and want to rescue data from a disable iPhone, you could try Gihosoft iPhone Data Recovery. Also feel free to ask questions on the iDevice is disabled error in the comments section below.

Monday, 13 August 2018

Apple also releases WatchOS 5 Beta 7

Along with iOS 12 beta 7, Apple has also seed beta 7 of watchOS 5 to registered developers and beta testers.
Must Read:Jihosoft iTunes Backup Unlocker
The registered developer can install the latest beta by going to Apple’s Developer Center page and installing the necessary configuration profile. Once the configuration is set, a developer can download the newest beta from the Apple Watch iOS app on iPhone.

Remember that the Apple Watch must be connected to the charger and have at least 50% of the battery life before you could install watchOS 5 beta 5 on your Apple Watch.


We have not found any significant changes and updates in this new beta, If found, we will update in next post.

Sunday, 12 August 2018

How to Delete iTunes Backup Files on Mac


How to Delete iTunes Backup Files on Mac

If you deleted a previous iTunes backup on your Mac, you’d know there are two ways to do it. The first method is to do so directly from iTunes, and then the second is to delete the files from its location on your Mac device.
1 Directly Delete iTunes Backup on Mac

To delete an iTunes backup, you must first open the program. Find the preferences option then click on it. Now click Devices and select the backup file you want to delete. Click “Delete Backup” and confirm.


2 Delete iTunes Backup from Application Folder on Mac

Deleting your backup of iTunes from your computer may also be done manually by removing it from its immediate location. Go through the following path on your Mac: Library> Application Support >MobileSync > Backup. Although the names of the file may seem strange, you can check the date they were created to decide which files to delete.


If you lost videos from iOS Camerall Roll which are nowhere to download again, you can use Gihosoft iPhone Data Recovery to get back deleted videos from iOS device including iPhone, iPad and iPod Touch.
Gihosoft Free Android Data Recovery can help you easily recover lost data such as photos, videos, contacts, text messages, WhatsApp & Viber chats from Google Pixel/XL or other Android phones effortlessly.
Jihosoft Android Data Recovery: the best Android Data Recovery software for Windows and Mac to recover deleted contacts, messages, photos, videos, WhatsApp and etc from Android devices.

Any app suggestions or topic recommendations are appreciated in the comments down below.

Saturday, 11 August 2018

How to Use Mac Keyboard for Typing On iPhone, iPad, Windows or Android Devices 2019


How to Use Mac Keyboard for Typing On iPhone, iPad, Windows or Android Devices

Configuring 1Keyboard is straightforward. Follow the steps mentioned below to make your Mac keyboard work as an external keyboard for your iPad, iPhone, PC and Android device or any other gadgets.

Step 1: Go to the Mac App Store for downloading and installing 1Keyboard app.

Step 2: Open the app by visiting the “Applications” folder or with the Launchpad window. You’d see its screen show up in the menu bar of Mac.

pair mac keyboard with iphone

Step 3: On your Mac, launch Bluetooth preferences and pair up the iDevice, Windows PC, Android, or other Bluetooth capable gadget. Ensure all devices have the Bluetooth activated and can be discovered.

Step 4: Provide confirmation for the Bluetooth connection, if asked.

pair mac keyboard with ipad

Step 5: Tap on the Menubar icon and select the device you want to use your Mac keyboard and start typing.

Once these devices are connected and paired, the app will send a notification that will give off a click sound. That basically tells you that the pairing is complete and you’re all ready to start typing on the paired gadget with the Mac keyboard. Go to this link for more detailed instructions on how a device should be paired with Mac.

As a great alternative app to 1Keyboard is Typeeto. You can download it directly from Mac App Store.

1Keyboard was previously available as a free download (the last time we checked) on the App Store for Mac. See if it’s still free and download it to switch your Mac keyboard into a wireless one for iPad, iPhone, PC, Android and other capable devices.

See Also: How to Use Old Mac As a Second Monitor

How to Connect Apple Wireless Keyboard With iPad, iPhone, Android or PC
Connecting the Apple keyboard with iPad, iPhone, PC or Android device is a really simple procedure. All you need to do is to go to Settings – Bluetooth from the device you want to pair and simply connect to the keyboard.

use apple keyboard with ipad

Before you search for a Bluetooth device, make sure that the keyboard is powered on and it’s not paired with another device (unpair if paired).

Hope you liked our tutorial on how to use Mac keyboard with iPhone, iPad, Windows PC, Android phone, TV or tablet. Please share this article to the social networks.


If you can’t sync with iTunes and want to rescue data from a disable iPhone, you could try Gihosoft iPhone Data Recovery. Also feel free to ask questions on the iDevice is disabled error in the comments section below.
You may also like:
How to Rescue iPhone Photos and Videos When Stuck in Recovery Mode
How to Get iMessage on Windows PC
4 Easy Ways to Transfer Photos from iPhone to Computer
If you can’t sync with iTunes and want to rescue data from a disable iPhone, you could try Gihosoft iPhone Data Recovery. Also feel free to ask questions on the iDevice is disabled error in the comments section below.

You may also like:


How to Rescue iPhone Photos and Videos When Stuck in Recovery Mode


How to Get iMessage on Windows PC


4 Easy Ways to Transfer Photos from iPhone to Computer

Wednesday, 8 August 2018

How to Remove iCloud Account from iPhone or iPad with iFile


How to Remove iCloud Account from iPhone or iPad with iFile

Find my iPhone is an excellent built into the current iPhones. It works as a protective shield against iPhone thievery, an iPhone that is lost as mark as lost via the iCloud website could never be used until the user remove iCloud activation lock from the device and marks it back as found again.


However, using appropriate iCloud credentials that the iPhone was initially signed up with the phone could be activated from the iCloud Lock from inside the phone. However, if the phone hasn’t been marked as found on Find my iPhone online, even an activated iPhone could turn into locked state again.


As it appears, disabling Find my iPhone could be necessary in many cases for iPhone users. For those who are new to iOS and iCloud might require a guideline, and that’s what we are providing today.


Disclaimer: Please use the guide in this post only for educational purposes.


Steps to Remove iCloud Account from iPhone or iPad with iFile


Step 1: This method requires an iOS device to be jailbroken if you want to remove iCloud activation lock. Using Yalu Jailbreak, the latest iPhones running latest iOS versions could be easily jailbroken. Click on this link to get to the Yalu jailbreak page where necessary tools and instructions are available. If your iPhone is already jailbroken you could skip this step.


Step 2: On a jailbroken iPhone or iPad, download these apps from Cydia – iFile, iCleaner and iFirewall.


Step 3: Use these tools individually for specific functions. For example, the iFile app too would remove any stored password on an iOS device. Navigate to var/keychains/ and delete the database keychain-2.db.


Step 4: Press and hold down the power button. Restart the iPhone. Proceed with the next step.


Step 5: Using iFirewall, navigate to Settings and add a new rule by choosing ‘Deny All Connections’ from the menu that appears. Another rule for the website domain ‘com.apple.com’ needs to be added to block all incoming and outgoing connections to and from the iPhone you are doing these tweaks on.


Step 6: Now using iCleaner, go to the first page of the app and disable iCloud Daemon.


Step 7: Once all these steps are done, restart your iPhone again. Press and hold the power button, everything on the screen will be blurred away but the ‘Slide to Power Off’ switch.


Step 8: Once the iPhone starts again, navigate to Settings and navigate to ‘Find my iPhone’ inside iCloud. The settings there should now be turned off, you can now fully remove the iCloud account that was associated with the iPhone you are using.


Step 9: After getting this step done, re-enable iCloud Daemon using iCleaner and uninstall iFirewall iOS 7 using Cydia. Re-install the iPhone again.


Step 10: After the device starts, navigate to Settings and start setting up a new account. Since the previous accounts have been deleted via unofficial methods, an error saying ‘Server can’t establish connection’ might appear. Keep trying until it works. It usually does after few tryouts.


Step 11: Once the sign in process is complete, activate Find my iPhone for the new account that you have created on this new iPhone following the official methods.


Step 12: There’s one final yet very crucial part to complete right now. Sign into iCloud.com using your computer and localize your new device. Check if a new connection has been formed by trying to play a sound on your iPhone from the iCloud window. If it does, click on Erase iPhone from iCloud window.


Step 13: The erasing process might get stuck, thus once it gets stuck when the erasing bar is almost towards the end; put the iPhone into DFU mode and restore using iTunes. Once the iPhone starts again, sign in with the Apple ID the iPhone had been erased with.


You’re done. The iCloud activation lock should be removed from your device. Now you can add new iCloud account on your device. We tested this method and it works with iOS 11 also.

What is Important if you Want to Remove iCloud Activation Lock

Try this method only if there’s a legitimate reason to disable Find my iPhone in activated iPhones. If you are trying this on a stolen iPhone, legal steps could be taken against you.

Gihosoft iPhone Data Recovery to retrieve contacts without any backup. This software is a professional and powerful tool for any iOS device user to easily get back their deleted data like messages and photos from iPhone or iPad, with its efficient engine and easy-to-use interface.

Apple Arcade: List of Launch Games

Apple has already started rolling out Apple Arcade to selected iPhone and iPad users ahead of its public release later this week. The initia...